(CNN) — If you want an excuse to sink your teeth into a warm and comforting plate of carbs and cheese, October 8 is the day to do it. It’s National Pierogi Day, so you have a marketing-mandated opportunity to indulge in a pile of pillowy dumplings.
But that’s not the only day to eat them. As the author of the cookbook “Pierogi Love: New Takes on an Old-World Comfort Food,” I can’t help but advocate for eating pierogies more than once a year. Pierogies can be a full meal or a snack and can be stuffed with so many different types of fillings that they’re ideal to eat year-round.
Pumpkin pierogies for Halloween? Turkey and stuffing pierogies in November? Cranberry pierogies in December? You get the idea. Pierogies are, in my opinion, a perfect way to fill a spot on your meal plan every month.
I’m from Pittsburgh, where “pierogies” is the common local vernacular. However, there are several ways to spell the word, and even more names if you’re referring to the larger family of Eastern European dumplings. You could call these dumplings pierogi, perogy, pirohi or vareniki, and there are also piroshky, kalduny and pelmeni, just to mention a few options.
But no matter what Pierogies are named, they’re impressively easy to make from scratch.
Making pierogi dough
Just as there are many ways to refer to these dumplings, there are a wide range of recipes for pierogi dough. There’s no one single correct version, and none is wrong either. It’s simply a matter of preference and, frequently, of family tradition.
When developing my base dough for “Pierogi Love,” I tested quite a few recipe variations to land on the ingredients that gave me the ideal supple, springy texture and buttery taste that complemented all fillings. If you’re afraid of making any homemade dough, try my pierogi dough as your gateway recipe. It’s simple to stir together, and it’s incredibly forgiving for beginners.
Instead of sour cream, which is often used in pierogi dough to make the dough soft and moist, I use plain Greek yogurt to add a little boost of protein without sacrificing any tangy flavor. Combined with egg and butter, these wet ingredients help create a rich dough that’s pliant and easy to handle.
To make it, stir the egg, yogurt and melted butter together in a bowl, then stir in flour and salt with a spatula to make a shaggy dough. Use your hands to knead the dough against the side of the bowl until the texture smooths out, then transfer to a clean work surface and knead a few times more. Cover the dough with your mixing bowl and let it rest for 15 minutes; then you’re ready to cut out rounds and shape your pierogies.
The dough is best made fresh, so don’t start until you’re ready to fill and cook or freeze your dumplings. However, you can make your fillings a few days in advance.
Filling and shaping pierogies
This may sound like heresy to pierogi traditionalists, but since “Pierogi Love” focuses on nontraditional fillings, I’m going to keep saying it. You can fill a pierogi with nearly any type of filling, and it will be delicious — not to mention a great way to use up leftovers.
Even if you do adhere to the more classic category of pierogi fillings, you can steer either sweet or savory in your choices. Mashed potatoes (with or without cheese), sauerkraut, mushrooms and seasoned ground meat are typical savory options. On the sweet side, fruit fillings such as blueberry, apricot and cherry as well as sweetened farmer’s cheese are common.
The chillier weather of fall practically begs for a plate of potato- and cheese-filled pierogies with a side of caramelized onions. However, if you want to try something more unusual, I’ve spent years devising some nontraditional fillings.
Apart from the 60 recipes in “Pierogi Love,” you can try “Everything Bagel” pierogies or pierogies with egg, cheese and Taylor ham for breakfast, or Ethiopian destaye-inspired dessert pierogies.
Potato and Cheddar Pierogies With Caramelized Onions
From “Pierogi Love: New Takes on an Old-World Comfort Food” by Casey Barber
Makes approximately 24
Basic savory dough
- 2 large eggs
- ½ cup (4 ounces, 113 grams) sour cream or plain Greek yogurt (full fat, reduced fat or nonfat)
- 3 tablespoons (1 ½ ounces, 43 grams) unsalted butter, melted and slightly cooled
- 1 teaspoon kosher salt
- 2 cups (8 ½ ounces, 240 grams) unbleached all-purpose flour
- 1 tablespoon water
For dough
1. Whisk 1 egg, sour cream or yogurt, butter and salt in a bowl. Pour flour into a large bowl. Gently stir wet ingredients into flour. The dough will initially be dry and shaggy, seeming as if it will never come together, but have no fear: Keep stirring, and it will pull itself into shape.
2. Once the dough starts to come together, press and smash it against the sides of the bowl with your palms, picking up dough bits and essentially kneading it within the bowl until it forms a ball.
3. Tip dough and any remaining shaggy flakes out onto a clean work surface or silicone pastry mat. Knead until smooth, about 1 minute. Cover dough with the bowl and let rest 15 minutes.
4. Whisk remaining egg and water in a small bowl for egg wash.
Pierogi filling
- ½ pound (8 ounces, 227 grams) Yukon Gold potatoes (about 1 medium or 2 small), cut into 2-inch pieces
- 1 tablespoon plus ¼ teaspoon kosher salt
- ¼ cup (1 ounce, 28 grams) finely shredded cheddar cheese
- 1 to 2 tablespoons heavy cream or whole milk
Caramelized onions
- 2 tablespoons (1 ounce, 28 grams) unsalted butter
- 1 large yellow onion halved lengthwise and thinly sliced into strips along the “grain”
- ¼ cup (or more) chicken or beef broth
For filling
Place potatoes in a medium saucepan. Add water to cover by 2 inches. Stir in 1 tablespoon salt. Cover and bring to a boil over medium heat. Uncover and cook until potatoes are tender, about 10 minutes. Drain potatoes and return to the pan. Place over low heat and stir for about 30 seconds to remove excess moisture.
Run potatoes through a ricer or food mill fitted with a fine disk into bowl. Stir in remaining ¼ teaspoon salt, cheese and 1 tablespoon cream; consistency should be firm enough to roll into a ball. If filling is too dry, stir in additional 1 tablespoon cream.
For caramelized onions
Melt butter in a medium skillet over low heat. Stir in onion and cook until starting to soften, about 10 minutes. Add ¼ cup broth and bring to a simmer. Cook, stirring occasionally, until onions are soft and deeply browned, about 1 ½ to 2 hours.
If onions start to burn before they’re fully caramelized, add 1 to 2 tablespoons additional broth as needed.
(Onions can be made up to 5 days ahead. Cover and refrigerate. Reheat in a skillet over low heat before serving.)
Assemble the pierogies
Line a rimmed baking sheet with waxed paper or parchment paper.
Divide rested dough into 4 equal pieces with a bench scraper or knife. Set aside 3 dough pieces and cover with the mixing bowl. Roll remaining dough as thinly as possible into a rough 8-by-12-inch rectangle.
Using a 3-inch round cookie cutter, cut out 6 rounds of dough. If the dough isn’t quartered evenly, you may get 5 rounds from one piece and 7 from another. Resist the temptation to reroll dough scraps for additional rounds. It seems wasteful, but the dough won’t be as tender the second time around.
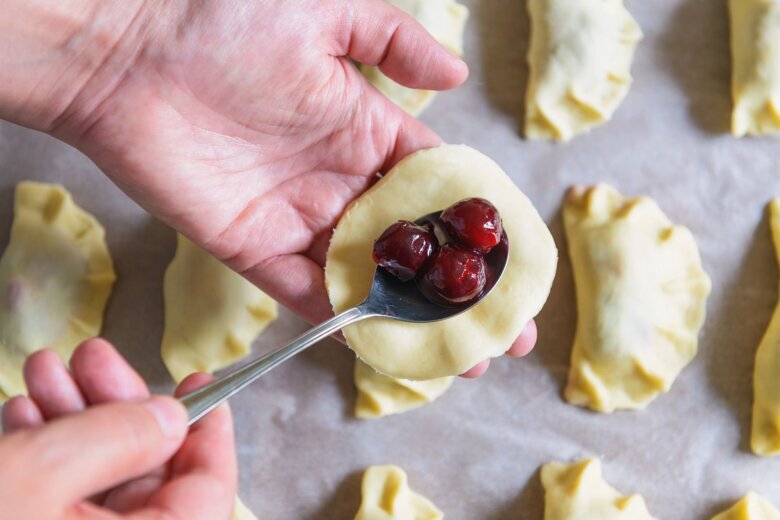
Spoon 1 teaspoon filling into the center of each dough round.
Using your finger, swipe a scant amount of egg wash — just a light touch — around the dough edge.
Fold into a half-moon shape: Either fold the dough over the filling on the work surface — I call this “the blanket” — or gently cup the pierogi in your hand in a U shape — I call this “the taco.” Gently but firmly seal the pierogi by pinching and squeezing the edges together with your thumb and pointer finger. Start with one pinch at the top, then move to one “corner” of the pierogi and pinch along the edge back to the top. Repeat on the opposite side to finish sealing the pierogi.
Transfer to the baking sheet and repeat with remaining dough rounds and filling. Freeze on the baking sheet, refrigerate up to 3 hours or cook immediately.
Serve with caramelized onions.
Cooking and storing pierogies
To boil fresh or frozen pierogies
Boil a pot of water over medium-high heat (fill approximately 1 quart water for every 6 pierogies). Add pierogies and cook until floating, 2 to 3 minutes for fresh and 4 to 5 minutes for frozen.
To pan-fry fresh or boiled pierogies
Heat 1 tablespoon neutral oil (like canola or vegetable) or melt 1 tablespoon unsalted butter in a skillet over medium heat. Add as many pierogies as will fit in a single layer without crowding. Cook until pierogies are brown and crispy, about 2 minutes per side. Repeat with additional oil or butter and pierogies.
To cook large batches for parties, you can also pan-fry pierogies on an electric or two-burner stovetop griddle.
To deep-fry fresh or frozen pierogies
Use an electric deep fryer or a large, high-sided pot filled with at least 2 inches of vegetable or canola oil. (Fill the pot no more than one-third full.) Heat oil to 350 degrees. Add pierogies and cook until golden brown; frying time varies based on equipment — about 3 minutes for fresh and 5 minutes for frozen.
Line a baking sheet with paper towels. Transfer pierogies to the baking sheet and cool for 1 minute.
When it’s time to shape your pierogies, you’ll need a few items: a rolling pin, a 3-inch round cookie cutter and a teaspoon for scooping the filling.
It’s easiest to divide the dough into 4 pieces and roll out one piece at a time. Cut rounds of dough with the cookie cutter, then scoop a teaspoon of filling into the center of each. With water or egg wash, use your finger to wet the edge of the dough, then pinch closed to seal. (You can also see this process in action in my step-by-step tutorial on how to make pierogies.)
Transfer each completed pierogi to a clean sheet pan or cutting board as you work. Once your batch is complete, you can either freeze the entire sheet pan of pierogies for a future meal or cook them immediately.
Best when boiled or fried
Both fresh and frozen pierogies taste best when boiled or fried — and yes, you can drop frozen pierogies straight into a pan of boiling water or oil without needing to thaw them first. That’s why they’re an ideal food to make in big batches and save for later. Baking homemade pierogies makes the dough tough and brittle, so I don’t advise it.
If you’re deep-frying pierogies, they’ll be crisp and golden in minutes. If you’re boiling pierogies, you may want to take the extra step and pan-fry them in butter or oil for a touch of caramelization, or you can leave them as is.
If you decide to pan-fry your boiled pierogies, remember to drain them well before adding them to a skillet with melted butter or hot oil, so the fat doesn’t pop and splatter.
Pierogies love to be dipped in a variety of sauces or served with a side of caramelized onions or sour cream. Dust sweet pierogies with a delicate blanket of confectioners’ sugar or serve with whipped cream.
Casey Barber is a food writer, artist and editor of the website Good Food Stories.
The-CNN-Wire
™ & © 2023 Cable News Network, Inc., a Warner Bros. Discovery Company. All rights reserved.